Monday
Feta Update - 2
This is just a small update letting everyone know that I have made my final feta cheese which I will be using for tastings on the "IY8 Nght"
Milk
 Most people don't know this but it takes lots of milk to make only a little bit of cheese. Across this project I have used 22L of milk to make 9 small cheese's
Ricotta Update 2
Recently I attempted to make a Mozzarella, but because I didn't have a proper recipe for it I searched for one on the internet, and found one that I liked, it was called 30 min mozzarella but I took a lot longer then 30 mins and I didn't end up with mozzarella at all, instead I was left with... you guessed it ricotta. 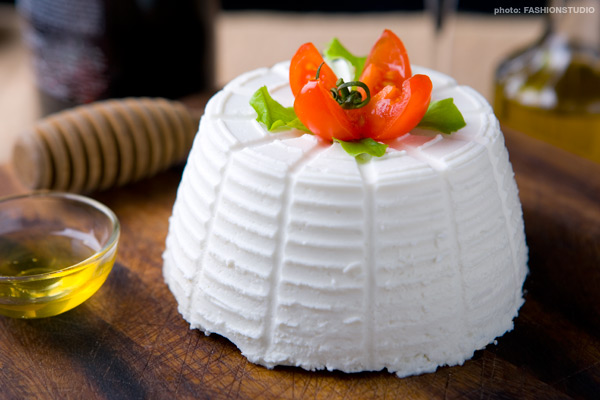
Although I wasn't left with the Mozzarella like i waned i was happy because I got more ricotta i which I used to make lots of mini ricotta and spinach triangles... Lesson learnt, i'm never trusting internet recipes again
Time spent on Project
If you refer back to the first Post I put up "IY8 Overview" It says that I need to have done 20 hours on this project including time spent on the journal (blog) and we have to keep a record of it so here's mine
1 hour - Setting up blog for the first time
4 1/2 hours - Making Farmhouse cheddar
3/4 hour - Typing recipe out for Farmhouse cheddar
1/2 hour - Typing first Farmhouse cheddar update
1/2 hour - Work on blog
5 hours - Creating Camemberts
1 1/2 hours - Typing Recipe out for Camembert
1/2 hour - Typing first update for Camembert
1/4 hour - Work on blog
2 hours - Making feta 1
2 hours - Making feta 2
1 hour - Typing recipe for feta's
1/2 hour - Typing update 1 for feta's
1/2 hour - Work on blog
3/4 hour - Making ricotta 1
1/2 hour - Making attempted mozzarella (Ricotta 2)
1/2 hour - Typing out recipe
1/2 hour - Typing ricotta update 1
2 hours - Making feta 3
3 hours - Work on blog
1/2 hour - Typing Farmhouse cheddar update 2
1/2 hour - Typing Camembert update 2
3 hours - working on blog
1/4 hour - Typing Ricotta update 2
= 32 hours :)
Camembert update 2
 The Camembert has now been sitting in the fridge for five weeks and has distinguished that famous white mould. It doesn't quite look like the ones in the shops I think this is because it was not completely flat and some parts are whiter than others.
When I first put my knife in to cut it open lots of gooey cheese started coming this worried me because I was afraid the whole inside would be like that but as I cut deeper I realized that the outer part was quite gooey and the inside was harder. I tasted really good

Farmhouse Cheddar update 2
Farmhouse Cheddar update 1
 Across the period that this cheese has been aging I have noticed that during the waxing process I have not completely covered the cheese leaving tiny gaps. This brought problems, the cheese became mouldy and began to smell horrible. Recently I have prised away the wax from the cheese and discovered that it was not as bad as I first thought, whilst there was a little patch of green in one corner the cheese looked reasonably good... Although I still wouldn't eat it if you paid me

Ricotta Update 1
 With less than 1 week to go till the IY8 presentation night I had to finish making my last cheese a Ricotta (recipe) It was a very simple cheese and I made it within a few hours. It was great fun and very inexpensive because the cheese does not need any starter culture, and can be made using full cream or non-homogenized milk. -Recipe-
I enjoyed making this cheese and have used some of the recipe to make my "Ricotta and spinach parcels" -->
Sunday
Feta Update - 1
 In the last week I have completed 2 Feta cheese -Recipe- the first one that I made, I forgot to add the most important ingredient (Mesophilic starter culture) This made the cheese so soft that it just turned into goo, and got very thick at the bottom. Also because I used Non-Homogenized milk, the cream didn't mix through the cheese like it normally would instead my cheese turned out with little yellow lumps of fat.
Once I had given up hope of trying to save my first feta, i began making another, this time very careful to make sure i add the starter culture. This Cheese turned out perfectly, and compared to my first, it tasted like heaven.
Now knowing the feta recipe off by heart I made another Feta this, one also turned out well. One of the feta my family and i had with crackers the other one i used on Pizza and to make "Spinach and Feta parcels"
It is currently 3 weeks until the IY8 open night and the cheese will go off in that time, so i will have to eat them

Time spent on cheese- 2 hours per cheese ( 6 hours )
Time left on project - negative 2 hours


Camembert update 1

 This was by far the most challenging experience across my cheese making journey, this cheese had quite a difficult recipe to follow, it was quite confusing and if you missed 1 thing or added to much of another the whole cheese would be ruined I have tried to simplify the recipe as much as I could but it is still confusing in some spots.
I have really enjoyed making this cheese and I hope once IY8 finishes i will be able to continue making more of them
Hours spent on Cheese - 5
Hours left on project - 6


Recipes - Ricotta
Ricotta Update 1
Ingredients

Ingredients
- 2L of either full or non-homogenized
- 1 tsp of citric acid diluted in at least 1/4 cup of cooled, boiled water
- 1 tsp of Cheese salt
- Calcium chloride (if using homogenized milk)
- 1 Ricotta mould and follower
- Thermometer
- Pipette
- Draining spoon
Step 1 - Sterilizing Equipment
- Set up a bucket or large container (I generally just use a small basin, fill it with cold water and add the correct amount of sterilization tablets)
- Keep all equipment that will come in contact in said tub. if you use something twice make sure you rinse it then place it back in the tub
Step 2 - Inoculating the milk
- First add your salt (and calcium chloride if using full cream)
- heat the milk in a pot to 90 C then take off heat and stir in your citric acid
- Ricotta should curdle immediately
Step 3 - Draining and Serving
- After that it should be ready to scoop into the Ricotta mould and follower
- Leave for 20 minutes before serving
- Leave the ricotta to cool for 2 - 3 hours
Monday
Recipes - Feta

Feta is a delicious cheese that can be made either with goats' or cows' milk. This recipe requires use of un-homogenized milk. However if you do not have access to un-homogenized, full cream milk. Just add calcium chloride after the milk has been heated to help firm up the curd Feta update 1
Ingredients
- 2L of Whole Non-Homogenized milk
- 1ml of rennet diluted in at least 4l of cooled, boiled water
- Approximately 1/4 a packet of starter culture (Either Mesophilic or Flora Danica) I recommend Mesophilic
- Calcium chloride (if using homogenized milk)
- salt for a 12% brine solution (Make 250ml of brine by diluting 5 teaspoons of salt in 250ml of cooled boiled water and adding 1.5ml of vinegar )
Equipment
- Cheese vat (tub)
- Cheese incubator
- 1 Feta mould and brining follower
- Butter Muslin
- Thermometer
- Pipette
- Draining spoon
- Long bladed knife
Method
Step 1 - Sterilizing Equipment
- Set up a bucket or large container (I generally just use a small basin, fill it with cold water and add the correct amount of sterilization tablets)
- Keep all equipment that will come in contact in said tub. if you use something twice make sure you rinse it then place it back in the tub
Step 2 - Inoculating the milk
- In the cheese vat bring the milk to 37C. Add calcium chloride if using homogenized milk and then add starter culture
- Add diluted rennet while stirring the milk
- Let the milk set for 90 minutes at a temperature of 37C in the Cheese Incubator
Step 3 - Cutting the Curd
- Cut the curd into 1.5 cm cubes and leave to rest at 37C for 1 hour
Step 4 - Stirring
- After an hour, gently stir the curd every 5 minutes for the next half hour
Step 5 - Draining and Moulding
- After half and hour of stirring, the curds are ready to be scooped into the feta mould with the draining spoon. At this point you may like to add herbs to the curd in the mould
- Once all the curd have been put into the Feta mould, leave to drain on the sink. After three hours, place a piece of butter muslin over the top of the mould and flip the cheese and mould upside down (this ensures even draining). Leave the cheese on the sink over night to drain.

- Pour the 12% brine solution in the provided Feta mould container. Leave the brine in bring container over night to cool (Leaving it to cool over night is not an important step, and it is OK if you leave it out)
- In the morning (or when ready) put the Feta and Feta mould into the Feta brining container filled with the brine solution put the lid on and refrigerate
- Feta should be ready to eat after it has soaked in the brine for at least five hours.
Thursday
Recipes - Camembert
This is a recipe for the cheese I have most recently made; Camembert
Camembert cheese has a soft and gooey inside surrounded by a harder white mould crust. It is a delicacy in many countries, including France, where it originated.
Camembert Update 1
Click here for a full history of Camembert
Ingredients
Step 6 - Ageing the cheese
Camembert cheese has a soft and gooey inside surrounded by a harder white mould crust. It is a delicacy in many countries, including France, where it originated.
Camembert Update 1
Click here for a full history of Camembert
Ingredients
- 2L of Whole Non-Homogenized milk
- 1ml of rennet diluted in at least 4l of cooled, boiled water
- Approximately 1/4 a packet of Penicillium camemeberti starter culture
- Approximately 1/4 a packet of Mesophilic starter culture
- Calcium chloride (if using homogenized milk)
- 1 tablespoon of cheese salt
- Double boiler (What is a Double boiler)
- Draining spoon
- Jug
- Teaspoon
- Thermometer
- long bladed knife
- Pippette
- Measuring Beaker
Step 1 - Sterilizing Equipment
- Set up a bucket or large container (I generally just use a small basin, fill it with cold water and add the correct amount of sterilization tablets)
- Keep all equiptment
- Pour milk into the double boiler and add the calcium chloride(if using homogeized)
- Heat the milk to 32C using the boiler
- stir in Penicillium camemeberti and Mesophilic starter culture
- Turn of the boiler and let it sit with the lid on for 45 minutes
- Mix in the rennet for 2 minutes using an up and down motion
- Now leave for a further 45 minutes
- Now cut the curd into 1 cm cubes
- Sowly stir the cubes with the drainnig spoon for 15 minutes
- Now put the lid on and let it sit for a further 15 minutes
- After, pour as much of the whey as you can down the drain without losing any of the curds
- Scoop the curds into the mould (put moulds near sink as it will drain)
- leave to sit until mixture subsizes, then use the rest of the mixture to fill to top of the mould
- Camembert is a softer cheese and will age best if you use a different method of pressing. This method involves placing sushi mats or "chuxs wipes" on either side of the mould and flip every hour for four hours (Example at 9 mins 50)
Step 6 - Ageing the cheese
- After 5 hours, remove the cheese from the mould and place into a container (like the one below) with a small dish of water leave the cheese foe 8 days
- Once eight days is up take out your cheese and wrap it tightly in cheese wrap or baking paper and place in the fridge
- After roughly 5 weeks the cheese will be ready to eat.

A trip to the Dairy

Wednesday
Farmhouse Cheddar update 1

This Is my first blog after making Farmhouse Cheddar.
This cheese is a fairly easy cheese to make. It took me
probably 5 hours to pour, stir cut and mill the cheese, until it was pressed in my makeshift cheese press, for 12 hours.
When making it I stuck fairly closely to the recipe; except that I could not find the rennet that came with my cheese kit, instead I used a product that was in our pantry "Junket". This was a little hard because I needed mL and it was in tablets, secondly, once I got what I thought was the right amount, but after leaving it for 45 mins, and then a further 15mins the milk had not turned into curds, at this point I was starting to worry, and I was afraid that the reaction would happen, so I left the Milk in the incubator over night and when I opened it in the morning I found that it had finally set properly and was ready to be cut.
 After cutting the curds I cooked them at 38C in the incubator. this process took longer than I thought it would and longer then the recipe said (Depends how much hot water you put in the incubator)
After cutting the curds I cooked them at 38C in the incubator. this process took longer than I thought it would and longer then the recipe said (Depends how much hot water you put in the incubator) Next I poured the mixture into a butter muslin lined colander and stir it slowly as it began to drain. Now the recipe said to tie up the corners and let it hang for 4-5 hours, but I just left it in the lined colander for 24 hours and it worked the same
 After packing a mould with the remaining mixture, I began pressing. The only problem was that I did not have enough room on my makeshift press to weigh it down with 20Kg, so I instead pressed it at 15Kg. This was almost the same only slightly moister
What things worked well?
- Cutting the curd
- It drained from the colander the way it should
- The vat fitted in the microwave
- There was just the right amount to fit into the mould

What didn't work so well:
- My rennet took longer then it should to set the curds

 - The cheese was moister then it should be and wasn't completely drained
Time it took to make:
- 5 Hours
Time left on project:
- 15 hours
Recipes - Farmhouse Cheddar
 This is a great cheddar to make if you have never made cheese before. It takes less time to make then reglar cheddar and is ready to eat after only five weeks of aging.
This recipe makes one small Farmhouse Cheddar
Ingredients
- 4L of Whole Non-Homogenized milk
- 1ml of rennet diluted in al least 4ml of cooled, boiled water
- Approximately 1/4 a packet of Mesophilic starter culture
- 1 tablespoon of cheese salt
- Cheese Wax
Equipment
- Cheese vat (tub)
- Cheese incubator
- Hard cheese mould with follower
- Butter Muslin
- Thermometer
- Pipette
- Measuring beaker
- Draining spoon
- Long bladed knife
- Weights or cheese press
Method
Step 1 - Sterilizing Equipment
- Set up a bucket or large container (I generally just use a small basin, fill it with cold water and add the correct amount of sterilization tablets)
- Keep all equipment that will come in contact in said tub. if you use something twice make sure you rinse it then place it back in the tub
Step 2 - Inoculating the milk
- In the cheese vat heat the milk to 32C using a microwave
- Stir in Mesophilic starter culture
- Cover and let cheese ripen for 45mins in Incubator
- Remove vat and pour in diluted rennet and stir it in using an up and down motion for the next minute
- Cover and let it sit for another 45 mins
Step 3 - Cutting the Curd
- Now cut the curd into 1 cm cubes
- Add hot water to the cheese incubator to slowly increase the temperature of the curds to 38C(this should take roughly 30mins)
- During the 30 mins continue to stir the curds from clumping together
- After a temperature of 38C has been achieved, cover the cheese vat and let at 38C for 5 mins inside the incubator
Step 4 - Draining and milling the curds
- Pour the curds into a butter muslin lined colander. Tie the corners of the cheesecloth into a knot and hang the bag in a warm spot to drain for 1 hour
- After an hour, place the curds into a bowl and break them up into small pieces. Mix in the cheese salt
Step 5 - Moulding and Pressing
- Pack the curds into a lined cheese mould. Fold a piece of butter muslin over the top of a piece of the cheese before pressing at 5kg for 10 mins
- Remove the cheese from the mould. Remove the cheese cloth, turn the cheese, redress the cheese in the butter muslin and press again for 10 mins at 10kg
- Repeat this process again but instead press at 20kg for 12 hours
Step 6 - Ageing the Cheese
- After 12 hours, remove the cheese from the mould and air dry on the cheese cheese mat for a few days until the cheese develops a natural dry rind. this should take 4 days
- While the cheese is air drying, make sure you turn it over regularly to prevent moisture from collecting on the bottom
- After the cheese has developed a natural rind, it is ready for waxing.
- Age the cheese at around 13C for 5 weeks
Tuesday
Recipes- Farmhouse Cheddar

Farmhouse Cheddar.
This is a great cheddar to make if you have never made cheese before. It takes less time to make then reglar cheddar and tastes just as good
Sunday
IY8 Overview
This is my first post so I'll try to explain what my task is and what I'm trying to achieve by doing it
Ok so for school we have a project called IY8. (Inspire Year 8) which involves every body in my year at school to do a project on what ever they want over a 10 week period, You can do almost anything: Create a website, write a novel, build a Pizza oven, or even make cheese (which is what I am attempting to do)
The only rules are,
-That you must do at least 20 hours on the project across the given weeks
-You must keep a journal of every thing you have done (which I am doing in the form of a Blog)
-And you must write a reflection at the end
-Plus you must have a mentor (My parents) that signs off certain comment boxes that your teachers check to see how you are going
Subscribe to:
Comments (Atom)